Creating personalized emails in Klaviyo involves using dynamic content, segmentation, and data-driven triggers to tailor your messages to individual recipients. Here’s a detailed guide on how to create personalized emails in Klaviyo:
Step 1: Gather Customer Data
- Collect Data: Ensure you have detailed customer data, such as names, purchase history, browsing behavior, and preferences. This data can be collected through sign-up forms, purchase records, and website tracking.
- Sync Data Sources: Integrate Klaviyo with your e-commerce platform (like Shopify or WooCommerce) and other data sources to ensure you have the most up-to-date information.
Step 2: Create Segments
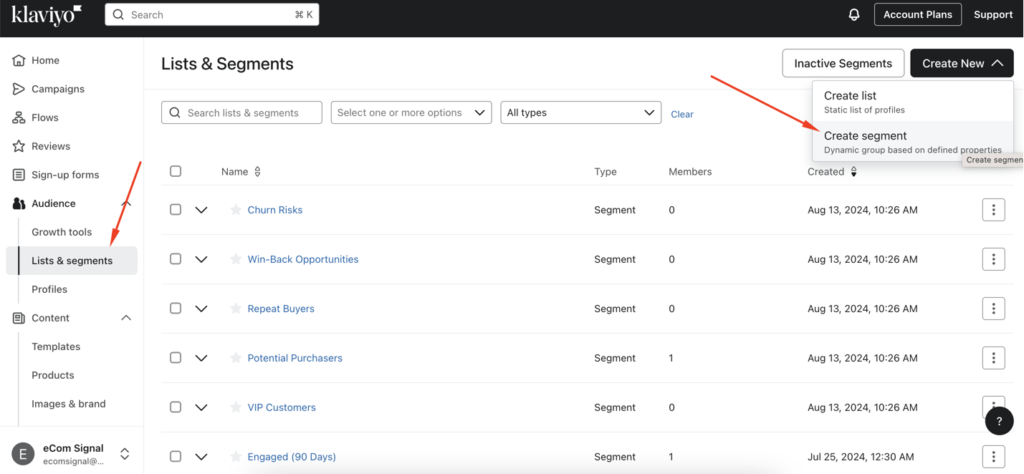
- Navigate to Lists & Segments: Click on “Lists & Segments” in the left-hand sidebar.
- Create a New Segment: Click “Create List / Segment” and select “Segment”.
- Define Segment Conditions: Use conditions like purchase history, browsing behavior, email engagement, and demographics to create specific segments. For example:
- Recent Purchasers: Customers who bought something in the last 30 days.
- Lapsed Customers: Customers who haven’t purchased in the last 90 days.
- High-Value Customers: Customers who have spent a significant amount over their lifetime.

Step 3: Design Your Email Template
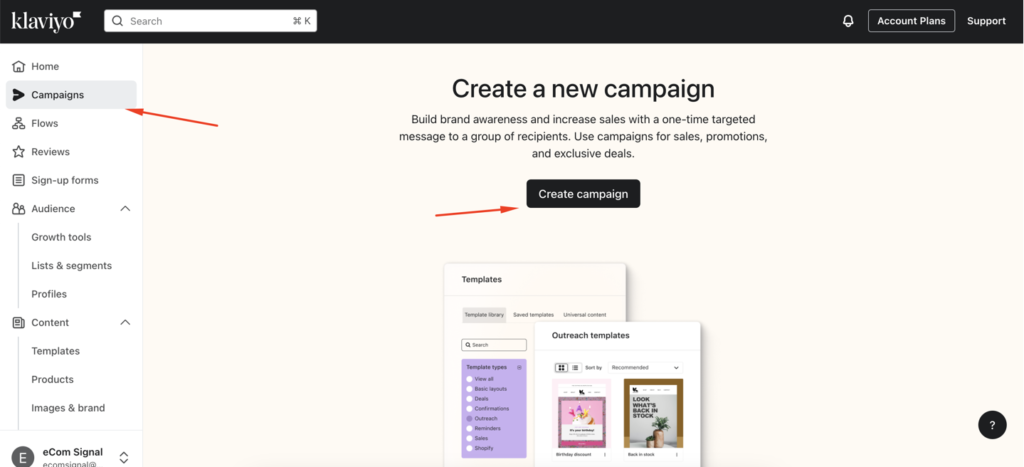
- Navigate to Campaigns or Flows: Depending on whether you’re sending a one-time campaign or an automated flow, go to the appropriate section.
- Create New Campaign or Flow: Click “Create Campaign” or “Create Flow” and select the type of email you want to send.
- Choose a Template: Select a pre-designed template or start from scratch.
- Add Dynamic Content:
- Personalization Tags: Use Klaviyo’s personalization tags to include dynamic content. For example, use
{{ first_name }}to insert the recipient’s first name. - Conditional Blocks: Set up conditional content blocks that display different content based on recipient data. For example, show a different product recommendation block based on past purchases.

Step 4: Customize Content
- Subject Line Personalization: Use dynamic tags in the subject line to catch the recipient’s attention. Example: “{{ first_name }}, check out our new arrivals just for you!”
- Body Content: Personalize the body of the email with relevant information:
- Product Recommendations: Use dynamic product blocks to recommend products based on the recipient’s past purchases or browsing history.
- Special Offers: Tailor offers and discounts based on customer segments, such as a loyalty discount for repeat customers.
- Personalized Messages: Include personalized messages that speak directly to the recipient’s interests or behaviors.
Step 5: Set Up Triggers and Automations
- Create Flows: Go to the “Flows” section and create automated email sequences triggered by specific actions, such as sign-ups, purchases, or cart abandonments.
- Configure Triggers: Set up triggers based on customer actions. For example:
- Welcome Series: Triggered when a new customer signs up.
- Post-Purchase Follow-Up: Triggered after a customer makes a purchase.
- Abandoned Cart: Triggered when a customer leaves items in their cart without checking out.
- Personalize Flow Emails: Within each flow email, use the same personalization techniques to ensure the content is relevant to the recipient.
Step 6: Test and Optimize
- Preview and Test: Before sending, use Klaviyo’s preview and test features to ensure your personalization tags are working correctly.
- A/B Testing: Conduct A/B tests to see which personalized elements perform best. Test different subject lines, content variations, and send times.
- Monitor Performance: After sending your emails, monitor their performance using Klaviyo’s analytics. Track metrics such as open rates, click rates, and conversion rates to gauge the effectiveness of your personalization efforts.
Example: Personalized Product Recommendation Email
- Segment Creation:
- Create a segment of customers who have purchased a specific category of products in the past.
- Email Template:
- Subject Line: “{{ first_name }}, we thought you’d love these!”
- Body Content:
- Greeting: “Hi {{ first_name }}, thanks for being a valued customer!”
- Product Recommendations: Insert a dynamic block showing products related to their past purchases.
- Special Offer: “As a thank you, here’s a 10% discount on your next purchase. Use code THANKYOU10.”
- Flow Setup:
- Create an automated flow that sends this email 30 days after their last purchase.
- Testing and Monitoring:
- Send test emails to ensure everything looks correct.
- Monitor the open rates and conversion rates to measure the success of your personalized email.
By following these steps, you can create highly personalized and engaging emails in Klaviyo that resonate with your customers and drive better retention and conversion rates. If you need more specific guidance or examples, feel free to ask!


