Creating a welcome series in Klaviyo involves setting up a series of automated emails that introduce new subscribers or customers to your brand, encourage engagement, and drive initial purchases. Here’s a step-by-step guide to creating an effective welcome series in Klaviyo:
Step 1: Plan Your Welcome Series
- Define Your Goals:
- Welcome new subscribers to your brand.
- Introduce your brand’s story, values, and best-selling products.
- Encourage the first purchase with a special offer or discount.
- Set expectations for future communications.
- Decide on the Number of Emails:
- Typically, a welcome series consists of 3-5 emails spaced out over a week or two.
- Outline Email Content:
- Email 1: Welcome and introduction to your brand.
- Email 2: Highlight popular products or categories.
- Email 3: Share customer testimonials or reviews.
- Email 4: Offer a discount or special promotion.
- Email 5: Encourage engagement on social media or your blog.
Step 2: Set Up the Welcome Series in Klaviyo
- Log in to Klaviyo:
- Access your account at Klaviyo.
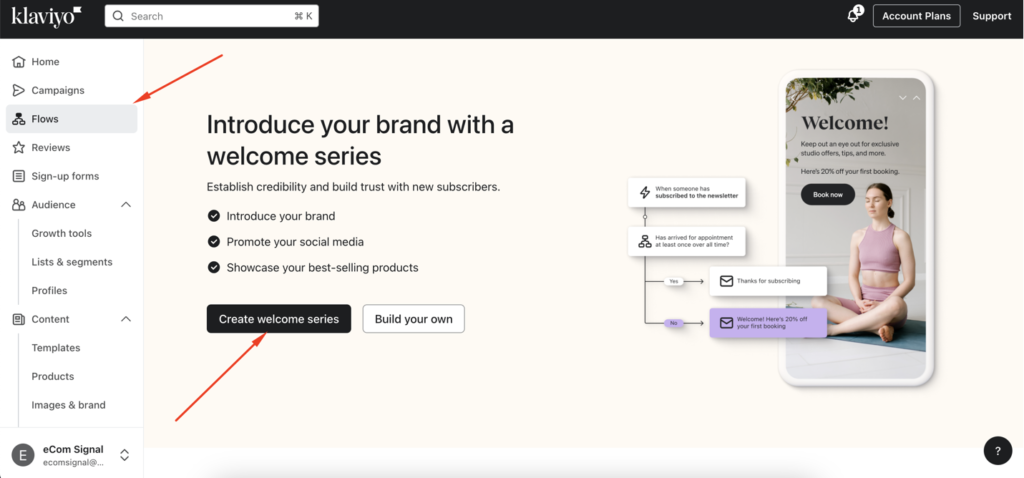
- Navigate to Flows:
- Click on “Flows” in the left-hand sidebar.
- Click “Create Flow”.
- Choose a Flow Template:
- Select the “Welcome Series” template from the list of available templates. If you prefer to start from scratch, choose “Create from Scratch”.

Step 3: Configure the Flow Trigger
- Set the Trigger:
- The trigger should be set to when someone subscribes to your list or is added to a segment.
- Select the appropriate list or segment (e.g., “Newsletter Subscribers” or “New Customers”).
- Configure Trigger Settings:
- Click on the trigger to customize settings, such as excluding existing subscribers or ensuring the flow only triggers once per person.
Step 4: Customize Each Email in the Series
- Edit Email 1:
- Click on the first email in the flow.
- Edit the content to include a warm welcome, introduction to your brand, and any immediate call to action (e.g., “Shop Now”).
- Personalize the email with the recipient’s name using dynamic tags (e.g., “Hi {{ first_name }}!”).
- Edit Subsequent Emails:
- Customize each subsequent email according to your plan. For example:
- Email 2: Showcase popular products with images and descriptions.
- Email 3: Include customer testimonials or reviews to build trust.
- Email 4: Offer a discount code or special promotion to encourage the first purchase.
- Email 5: Encourage engagement by inviting them to follow your social media accounts or read your latest blog post.
- Add Personalization:
- Use dynamic content to tailor emails based on subscriber data, such as browsing history or location.
- Include personalized product recommendations based on the recipient’s preferences.
Step 5: Set Timings and Delays
- Adjust Timing Between Emails:
- Click on the time delay between each email in the flow.
- Set appropriate delays (e.g., 2-3 days between each email) to keep your brand top of mind without overwhelming the recipient.
Step 6: Review and Test the Flow
- Review Content and Settings:
- Double-check each email’s content, triggers, and timing.
- Ensure all links, images, and dynamic content are working correctly.
- Send Test Emails:
- Send test emails to yourself or your team to review the content and ensure everything looks as expected.
Step 7: Activate the Flow
- Activate:
- Once you’re satisfied with the setup, click the “Turn On” button to activate the flow.
- Monitor the flow’s performance over time to ensure it’s working as expected.
Example: Detailed Welcome Series Content
- Email 1: Welcome to [Brand Name]!
- Subject Line: “Welcome to [Brand Name], {{ first_name }}!”
- Content: Warm welcome message, brief introduction to your brand, and a thank you for subscribing. Include a call to action (e.g., “Explore Our Collection”).
- Email 2: Discover Our Best-Selling Products
- Subject Line: “Our Most Loved Products Just for You!”
- Content: Showcase best-selling or featured products with images and descriptions. Include a link to shop.
- Email 3: Hear From Our Happy Customers
- Subject Line: “Why Our Customers Love Us”
- Content: Share testimonials, reviews, and customer photos. Include a call to action to leave a review or share their own experience.
- Email 4: Special Offer Just for You
- Subject Line: “Enjoy 10% Off Your First Order!”
- Content: Offer a discount code or special promotion. Include clear instructions on how to redeem the offer and a sense of urgency (e.g., “Limited Time Offer”).
- Email 5: Stay Connected with [Brand Name]
- Subject Line: “Let’s Stay in Touch!”
- Content: Encourage recipients to follow your social media accounts, join your community, or read your blog. Highlight the benefits of staying connected.
By following these steps, you can create an engaging and effective welcome series in Klaviyo that introduces new subscribers to your brand, encourages their first purchase, and fosters long-term engagement. If you have any specific questions or need further assistance, feel free to ask!


