Integrating Klaviyo with WordPress can significantly enhance your email marketing efforts, allowing you to harness the power of targeted email campaigns directly from your website. Klaviyo is a powerful email marketing platform that helps businesses grow by enabling them to send personalized and effective email campaigns. By connecting Klaviyo to your WordPress site, you can capture leads, track user behavior, and create highly targeted email marketing strategies.
Prerequisites
Before starting the integration process, ensure you have the following:
- Active WordPress Site: Ensure you have a WordPress site up and running.
- Klaviyo Account: Sign up for a Klaviyo account if you haven’t already.
- Administrator Access: Ensure you have administrator access to your WordPress site.
- Klaviyo API Key: You will need to generate an API key from your Klaviyo account.
Step 1: Install and Activate the Klaviyo Plugin
- Login to WordPress Admin Panel:
- Navigate to your WordPress admin dashboard by entering
yourwebsite.com/wp-adminin your browser.
- Navigate to Plugins:
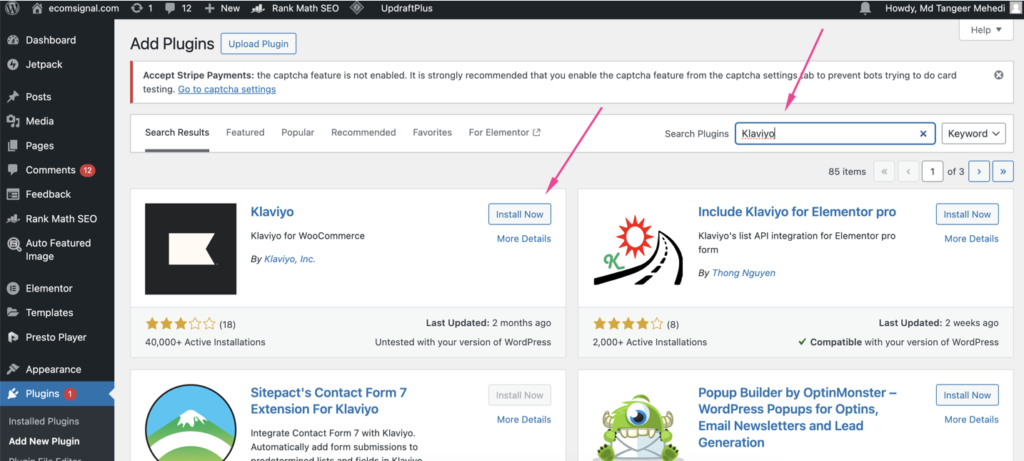
- In the left sidebar, hover over “Plugins” and click “Add New.”

- Search for Klaviyo:
- In the search bar on the top right, type “Klaviyo” and press Enter.

- Install the Plugin:
- Find the “Klaviyo for WooCommerce” plugin in the search results and click the “Install Now” button.
- Activate the Plugin:
- Once the installation is complete, click the “Activate” button.
Step 2: Connect Klaviyo to WordPress
- Generate a Klaviyo API Key:
- Log in to your Klaviyo account.
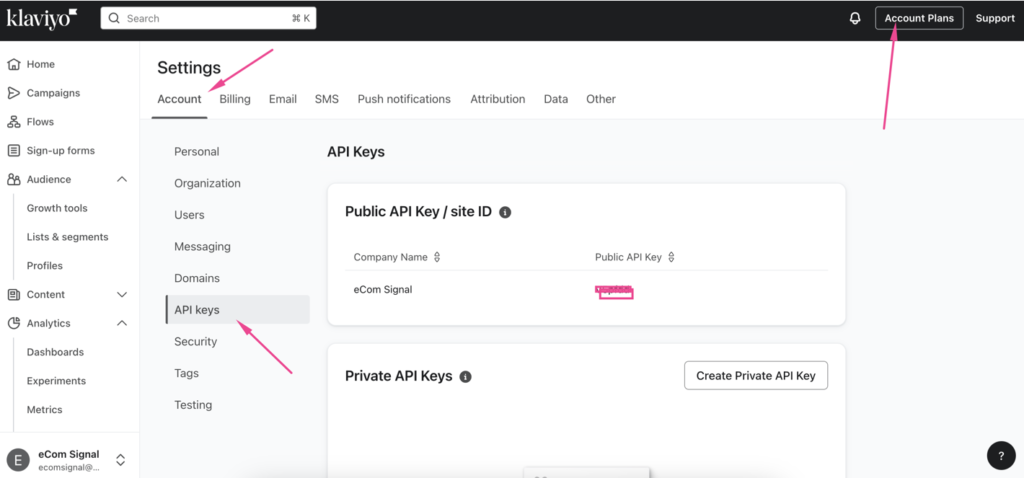
- Navigate to the “Account” section by clicking your profile in the top right corner and selecting “Account.”
- Click on the “Settings” dropdown and select “API Keys.“
- Click the “Create API Key” button and name your new API key (e.g., “WordPress Integration”).
- Copy the generated API key to your clipboard.

- Enter the API Key in WordPress:
- Return to your WordPress admin dashboard.
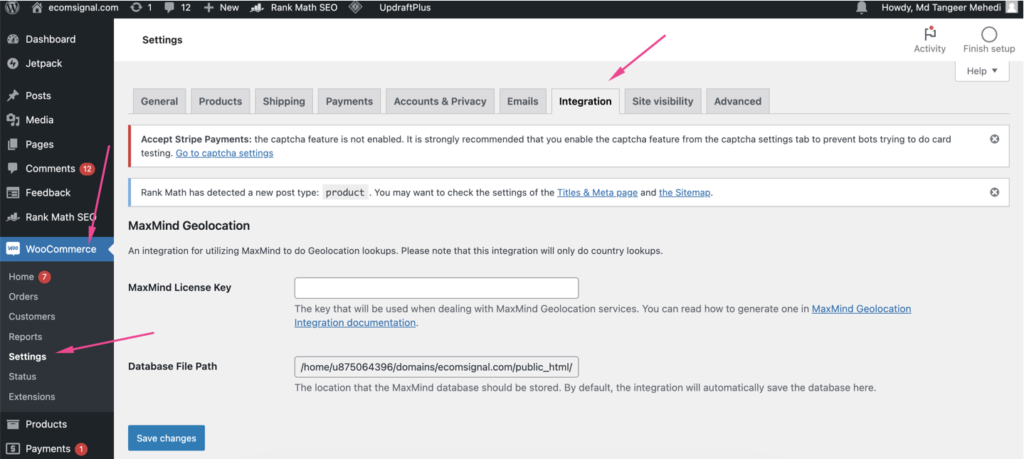
- Navigate to “WooCommerce” in the left sidebar and click on “Settings.”
- Select the “Integration” tab and find the Klaviyo section.
- Paste your Klaviyo API key into the provided field.
- Click “Save changes” to store the API key.

Step 3: Configure Klaviyo Settings in WordPress
- Access Klaviyo Settings:
- Go to “WooCommerce” > “Settings” > “Integration” and click on the Klaviyo tab.

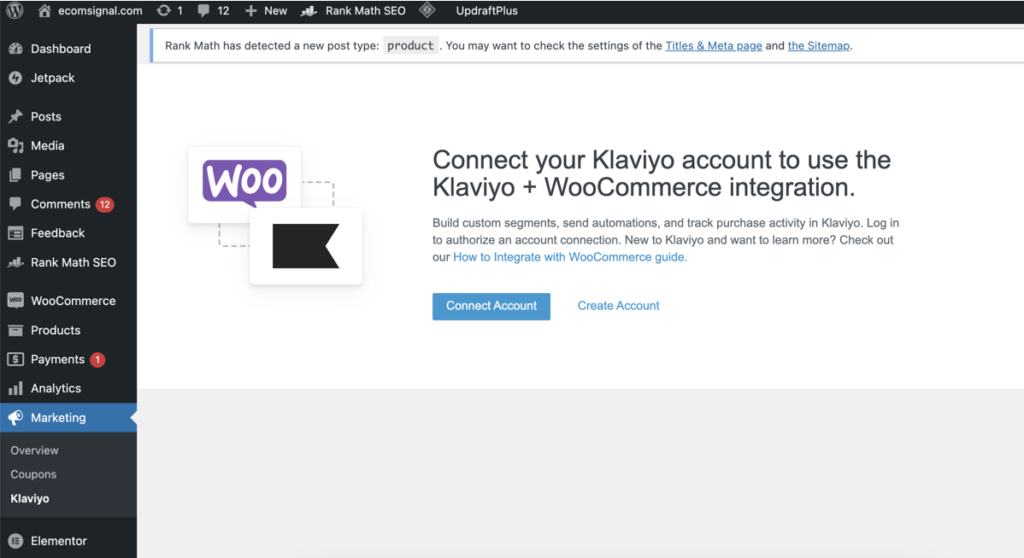
Please note: You need to connect your Klaviyo account first, and then you’ll see the Klaviyo integration option.
- Enable Web Tracking:
- Check the box to enable Klaviyo web tracking on your site. This allows Klaviyo to track visitors and their behavior, helping you create targeted email campaigns.
- Sync Historical Data:
- If you want to sync historical data from your WordPress site to Klaviyo, check the appropriate box. This can help you include past customer interactions in your marketing efforts.
- Configure Other Settings:
- Review and configure any other settings available in this section based on your specific needs.
Step 4: Add Klaviyo Signup Forms to WordPress
- Create a Signup Form in Klaviyo:
- Log in to your Klaviyo account.
- Navigate to “Signup Forms” in the left sidebar and click “Create Signup Form.”
- Choose a template or start from scratch, and customize the form to fit your brand.
- Save and publish the form.
- Embed the Form on Your WordPress Site:
- Go back to your WordPress admin dashboard.
- Navigate to the page or post where you want to embed the signup form.
- In the WordPress editor, click the “+” button to add a new block, then select “Custom HTML.”
- Paste the Klaviyo form embed code into the HTML block.
- Save or update the page/post to make the form live on your site.
Step 5: Syncing WordPress Data with Klaviyo
- Verify Data Synchronization:
- After completing the initial setup, it’s important to ensure that your WordPress site is properly syncing data with Klaviyo.
- In your Klaviyo account, navigate to “Profiles” and check for new subscribers or customer data that should be coming from your WordPress site.
- Ensure that user activities, such as form submissions and product views, are being tracked.
- Test the Integration:
- Perform a few test actions on your WordPress site, such as submitting a signup form or making a test purchase (if you’re using WooCommerce).
- Verify that these actions are being recorded in Klaviyo.
- Check your Klaviyo dashboard for real-time data updates and ensure that all relevant information is being captured.
- Troubleshooting:
- If you encounter any issues, recheck the API key and settings configuration in both WordPress and Klaviyo.
- Ensure that the Klaviyo plugin is up to date.
- Refer to Klaviyo’s documentation or support for any specific troubleshooting tips.
Conclusion
Integrating Klaviyo with your WordPress site can significantly enhance your email marketing capabilities. This integration allows you to capture leads directly from your website, track user behavior, and create highly targeted email campaigns. By following this step-by-step guide, you can seamlessly connect Klaviyo to your WordPress site and start leveraging powerful marketing tools to grow your business.


